Getting Started with a Simple Web Page
Listing 2.1 shows the
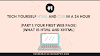
text you would type and save to create a simple HTML page. If you opened this
file with a web browser such as Internet Explorer, you would see the page shown
in Figure 2.1. Every web page you create
must include the <html>, <head>,
<title>, and <body> tags.
Listing 2.1. The <html>,
<head>, <title>, and <body>
Tags<?xml version="1.0" encoding="UTF-8"?>
<!DOCTYPE html PUBLIC "-//W3C//DTD XHTML 1.1//EN"
  "http://www.w3.org/TR/xhtml11/DTD/xhtml11.dtd">
<html xmlns="http://www.w3.org/1999/xhtml" xml:lang="en">
<head>
<title>The First Web Page</title>
</head>
<body>
<p>
In the beginning, Tim created the HyperText Markup Language. The Internet
was without form and void, and text was upon the face of the monitor and
the Hands of Tim were moving over the face of the keyboard. And Tim said,
Let there be links; and there were links. And Tim saw that the links were
good; and Tim separated the links from the text. Tim called the links
Anchors, and the text He called Other Stuff. And the whole thing together
was the first Web Page.
</p>
</body>
</html>
[View full size
image] 
In Listing 2.1, as in
every HTML page, the words starting with < and ending with
> are actually coded commands. These coded commands are called HTML
tags because they "tag" pieces of text and tell the web browser what kind of
text it is. This allows the web browser to display the text appropriately.
An HTML tag is a coded command used to indicate how part of a
web page should be displayed.
The first few lines of code in the web page serve as standard
boilerplate code that you will include in all of your pages. This code actually
identifies the page as an XHTML 1.1 document, which means that technically the
web page is an XHTML page. All the pages developed throughout the book are XHTML
1.1 pages. Because XHTML is a more structured version of HTML, it's still okay
to generally refer to all the pages in the book as HTML pages. By targeting
XHTML 1.1 with your code, you are developing web pages that adhere to the very
latest web standards. This is a good thing!
Before you learn what the HTML tags in Listing 2.1 mean, you might want to see exactly how I
went about creating and viewing the document itself:
|
1. |
Type all the text in Listing 2.1, including the HTML tags, in Windows Notepad
(or Macintosh TextEdit). |
|
2. |
Select File, Save As and be sure to select Text Documents as
the file type. |
|
3. |
Name the file
firstpage.html.
|
|
4. |
Choose the folder on your hard drive where you would like to
keep your web pagesand remember which one you choose! Click the Save or OK
button to save the file. |
|
5. |
Now start your favorite web browser. (Leave Notepad running,
too. That way you can easily switch back and forth between viewing and editing
your page.)
|
You don't need to be connected to the Internet to view a web
page stored on your own computer. By default, your web browser tries to connect
to the Internet every time you start it, which makes sense most of the time.
However, this can be a hassle if you're developing pages locally on your hard
drive (offline) and you keep getting errors about a page not being found. If you
have a full-time web connection via a LAN, cable modem, or DSL, this is a moot
point because the browser will never complain about being offline. Otherwise,
the appropriate disciplinary action will depend on your breed of browser:
-
In Microsoft Internet Explorer for Windows, select Tools,
Internet Options; click the General tab and click Use Blank under Home Page. In
Internet Explorer under Macintosh OS X, look in the application preferences
under the Browser Display set, and click the Use None button in the Home Page
cluster.
-
In Mozilla Firefox, select ToolsTools, Options; click the Use
Blank Page button under the General settings.
-
Other browsers should have a similar setting for changing the
default home page so that it doesn't attempt to access the
Internet.
This teaches your browser not to run off and fetch a page from
the Internet every time it starts. Of course, you'll likely want to restore the
default setting after you're finished working
locally. | |
|
6. |
In Internet Explorer, select File, Open and click Browse. If
you're using Firefox, select File, followed by Open File. Navigate to the
appropriate folder and select the firstpage.html file. You can also
drag and drop the firstpage.html file onto the browser window. Voilà! You should
see the page shown in Figure 2.1. HTML Tags Every Web Page Must Have
The time has come for the secret language of HTML tags to be
revealed to you. When you understand this language, you will have creative
powers far beyond those of other humans. Don't tell the other humans, but it's
really pretty easy.
Before you get into the HTML tags, let's first address the
messy-looking code at the top of Listing 2.1. The first line indicates
that the HTML document is in fact an XML document:
<?xml version="1.0" encoding="UTF-8"?>
The version of XML is set to 1.0, which is fairly standard, as
is the type of character encoding (UTF-8).
|
It isn't terribly important that you understand concepts such
as character encoding at this point. What is important is that you include the
appropriate boilerplate code in your pages so that they adhere to the latest web
standards. |
The second and third lines of code in Listing 2.1 are even more complicated
looking:
<!DOCTYPE html PUBLIC "-//W3C//DTD XHTML 1.1//EN"
"http://www.w3.org/TR/xhtml11/DTD/xhtml11.dtd">
Again, the specifics of this code aren't terribly important as
long as you remember to include the code at the start of your pages. This code
identifies the document as being XHTML 1.1, which then allows web browsers to
check and make sure that the code meets all the requirements of XHTML 1.1.
|
The XML/XHTML boilerplate code isn't strictly required in order
for you to create web pages. You can delete the opening lines of code in the
example so that the page starts with the <html> tag, and it will
still open fine in a web browser. The reason for including the extra code has to
do with ensuring that your pages smoothly migrate to the new and improved Web
that has already started unfolding. Additionally, the extra code allows you to
validate your web pages for accuracy, which you'll learn how to do a bit later
in this lesson. |
Most HTML tags have two parts: an opening tag, which indicates where a piece of text
begins, and a closing tag, which indicates where
the piece of text ends. Closing tags start with a / (forward slash)
just after the < symbol. Another type of tag is the empty tag, which is unique in that it doesn't involve a
pair of matching opening and closing tags. Instead, an empty tag consists of a
single tag that starts with a < and ends with a / just
before the > symbol. Following is a quick summary of these three
tags just to make sure you understand the role each of them plays:
-
An opening tag is an HTML tag
that indicates the start of an HTML command; the text affected by the command
appears after the opening tag. Opening tags always begin with < and
end with >, as in <html>.
-
A closing tag is an HTML tag
that indicates the end of an HTML command; the text affected by the command
appears before the closing tag. Closing tags always begin with </
and end with >, as in </html>.
-
An empty tag is an HTML tag that
issues an HTML command without enclosing any text in the page. Empty tags always
begin with < and end with />, as in <br
/>.
For example, the <body> tag in Listing 2.1 tells the web browser where
the actual body text of the page begins, and </body> indicates
where it ends. Everything between the <body> and
</body> tags will appear in the main display area of the web
browser window, as you can see if you refer to Figure 2.1, shown earlier.
Web browsers display any text between <title>
and </title> at the very top of the browser window, as you can
also see in Figure 2.1.
The title text is also used to identify the page on the browser's Bookmarks or
Favorites menu, depending on which browser you use. It's important to provide a
title for your pages so that visitors to the page can properly bookmark it for
future reference.
You will use the <body> and
<title> tags in every HTML page you create because every web page
needs a title and some body text. You will also use the other two tags shown in
Listing 2.1,
<html> and <head>. Putting <html>
at the very beginning of a document simply indicates that this is a web page.
The </html> at the end indicates that the web page is over.
Within a page, there is a head section and a body section, each
of which is identified by <head> and <body> tags.
The idea is that information in the head of the page somehow describes the page
but isn't actually displayed by a web browser. Information placed in the body,
however, is displayed by a web browser. The <head> tag always
appears near the beginning of the HTML code for a page, just after the opening
<html> tag.
|
You no doubt noticed that there is some extra code associated
with the <html> tag in the example. This code consists of two
attributes (xmlns and xml:lang), which are used to specify
additional information related to the tag. These two attributes are standard
requirements of all XHTML web pages. |
The <title> tag used to identify the title of a
page appears within the head of the page, which means it is placed after the
opening <head> tag and before the closing </head>
tag. (Upcoming lessons reveal some other advanced header information that can go
between <head> and </head>, such as style sheet
rules that are used to format the page.)
|
You may find it convenient to create and save a bare-bones page (also known as a skeleton page) with just the opening and closing
<html>, <head>, <title>, and
<body> tags, similar to the document in Listing 2.1. You can then open that
document as a starting point whenever you want to make a new web page and save
yourself the trouble of typing out all those obligatory tags every time. |
The <p> tag used in Listing 2.1 is used to enclose a
paragraph of text. It isn't entirely necessary in this example because there is
only one paragraph, but it becomes very important in web pages that have
multiple paragraphs of text.
Organizing a Page with Paragraphs and Line
Breaks
When a web browser displays HTML pages, it pays no attention to
line endings or the number of spaces between words. For example, the top version
of the poem shown in Figure 2.2 appears
with a single space between all words, even though that's not how it's entered
in Listing 2.2. This is because extra
whitespace in HTML code is automatically reduced down to a single space.
Additionally, when the text reaches the edge of the browser window, it
automatically wraps down to the next line, no matter where the line breaks were
in the original HTML file; in this example, the text all happened to fit on one
line.
Listing 2.2. HTML for the Page Shown in Figure 2.2<?xml version="1.0" encoding="UTF-8"?>
<!DOCTYPE html PUBLIC "-//W3C//DTD XHTML 1.1//EN"
"http://www.w3.org/TR/xhtml11/DTD/xhtml11.dtd">
<html xmlns="http://www.w3.org/1999/xhtml" xml:lang="en">
<head>
<title>The Advertising Agency Song</title>
</head>
<body>
<p>
When your client's hopping mad,
put his picture in the ad.
If he still should prove refractory,
add a picture of his factory.
</p>
<hr />
<p>
When your client's hopping mad,<br />
put his picture in the ad.
</p>
<p>
If he still should prove refractory,<br />
add a picture of his factory.
</p>
</body>
</html>
[View full size
image] 
You must use HTML tags if you want to control where line and
paragraph breaks actually appear. To skip a line between paragraphs, put a
<p> tag at the beginning of each paragraph and a
</p> tag at the end. In other words, enclose the text of the
paragraph within a pair of matching <p> and </p>
tags.
The <br /> tag forces a line break within a
paragraph. Unlike the other tags you've seen so far, <br />
doesn't require a closing </br> tagthis is one of those empty
tags I was talking about earlier. This is also an example of where XHTML enters
the web page picture, because normal HTML doesn't require the / in
empty tags. However, the newer XHTML standard does, so it's important for you to
stick to the latest standards and create web pages that are coded properlyalways
code empty tags so that they end with />.
|
Note that most web pages you see on the Internet today use
<br> instead of <br />, and the current crop of
web browser software treats them both the same. However, you may save yourself a
lot of work rewriting your pages in the future if you get in the habit of using
the newer <br /> form of the tag now.
Likewise, the closing </p> tag is always
optional in HTML 4 and is often left out by web page authors today. Closing
</p> tags are required by the new XHTML standard, so I recommend
that you always include them. Developing clean HTML coding habits is a very
important part of becoming a successful web page designer. |
The poem in Listing 2.2
and Figure 2.2 shows the <br
/> and <p> tags being used to separate the lines and
verses of a rhyming advertising agency song. You might have also noticed the
<hr /> tag in the listing, which causes a horizontal rule line to
appear on the page (see Figure 2.2).
Inserting a horizontal rule with the <hr /> tag also causes a
line break, even if you don't include a <br /> tag along with it.
For a little extra blank space above or below a horizontal rule, you can put a
<p> tag before the <hr /> tag and a
</p> tag after it, effectively placing the horizontal rule within
its own paragraph.
Like <br />, the <hr />
horizontal rule tag is an empty tag and therefore never gets a closing
</hr> tag.
Try It Yourself
Take a passage of text and try your hand at formatting it as
proper HTML:
|
1. |
Add <html><head><title>My
Title</title></head><body> to the
beginning of the text (using your own title for your page instead of My Title). Also include the boilerplate code
at the top of the page that takes care of meeting the requirements of
XHTML.
|
|
2. |
Add </body></html> to the very end of
the text.
|
|
3. |
Add a <p> tag at the beginning of each
paragraph and a </p> tag at the end of each
paragraph.
|
|
4. |
Use <br /> tags anywhere you want
single-spaced line breaks.
|
|
5. |
Use <hr /> to draw horizontal rules separating
major sections of text, or wherever you'd like to see a line across the
page.
|
|
6. |
Save the file as mypage.html (using your own filename
instead of mypage).
|
If you are using a word processor to create the web page, be
sure to save the HTML file in plain-text or ASCII
format. | |
|
7. |
Open the file in a web browser to see your web
page.
|
|
8. |
If something doesn't look right, go back to the text editor
to make corrections and save the file again. You then need to click
Reload/Refresh in the browser to see the changes you made to the web page. |
Calling Out Text with Headings
When you browse through web pages on the Internet, you'll
notice that many of them have a heading at the top that appears larger and
bolder than the rest of the text. Listing
2.3 is a simple web page containing an example of a heading as compared to
normal paragraph text. Any text between <h1> and
</h1> tags will appear as a large heading. Additionally,
<h2> and <h3> make smaller headings, and so on
down the line of heading tags.
|
The sample page in Listing
2.3 is part of a larger example that you'll continue to work on as you
progress through the book. I thought a practical example would help you get a
more applied feel for HTML, so I'll guide you through the development of a web
site for a recreational hockey team. In fact, it's the hockey team that I happen
to play on, Music City Mafia. My hockey buddies were nice enough to allow me to
use their ugly mugs as examples throughout the
book! |
Listing 2.3. Heading Tags<?xml version="1.0" encoding="UTF-8"?>
<!DOCTYPE html PUBLIC "-//W3C//DTD XHTML 1.1//EN"
"http://www.w3.org/TR/xhtml11/DTD/xhtml11.dtd">
<html xmlns="http://www.w3.org/1999/xhtml" xml:lang="en">
<head>
<title>Music City Mafia - Terry Lancaster</title>
</head>
<body>
<h1>16 - Terry Lancaster</h1>
<p>
<img src="tlancaster.jpg" alt="Terry "Big T" Lancaster" /><br />
Nickname: Big T<br />
Position: RW<br />
Height: 6'3"<br />
Weight: 195<br />
Shoots: Left<br />
Age: 40<br />
Birthplace: Nashville, TN
</p>
<hr />
<p>
Favorite NHL Player: Brett Hull<br />
Favorite NHL Team: Nashville Predators<br />
Favorite Southern Fixin: Skillet Fried Potatoes<br />
Favorite Meat and Three: Swett's<br />
Favorite Country Star: Patsy Cline<br />
Favorite Mafia Moment: "Chet finishing a game with his eyelid completely
slashed through."
</p>
</body>
</html>
|
By now you've probably caught on to the fact that HTML code is
indented to reveal the relationship between different parts of the HTML
document. This indentation is entirely voluntaryyou could just as easily run all
the tags together with no spaces or line breaks and they would still look fine
when viewed in a browser. The indentations are for you so that you can quickly
look at a page full of code and understand how it fits together. Indenting your
code is a very good web design habit, and ultimately makes your pages easier to
maintain. |
As you can see in Figure
2.3, the HTML that creates headings couldn't be simpler. In this example,
the jersey number and name of the hockey player are made larger and more
prominent on the page via the <h1> tag. To create the big level-1
heading, you just put an <h1> tag at the beginning and a
</h1> tag at the end. For a slightly smaller level-2 heading, you
can use <h2> and </h2>, and for a little level-3
heading, use <h3> and </h3>.
[View full size
image] 
|
I'm admittedly jumping the gun a bit by including an image in
this sample page, but sometimes it's worth stepping just outside of your comfort
zone to get a desired effect. You'll learn all about creating and using images
in web pages in Hour 7, "Creating
Your Own Web Page Graphics," and Hour
8, "Putting Graphics on a Web Page," but for now all you need to know is
that a tag named <img> is responsible for placing an image on a
page. |
|
While we're on the subject of hockey and HTML, check out http://www.azhockey.com/unusual.html for some highly
entertaining and unusual stories about the sport of hockey. This page is also a
good example of how simple a web page can be yet still do a decent job of
presenting information to the visitor. I'm not suggesting that this page should
get a design award, but it's a good example of understatement on the web, which
can be a refreshing change of pace. |
Theoretically, you can also use <h4>,
<h5>, and <h6> to make progressively less
important headings, but nobody uses these very muchafter all, what's the point
of a heading if it's not big and bold? Besides, most web browsers don't show a
noticeable difference between these and the small <h3> headings
anyway. In the sample page shown in the figure, it was sufficient to simply use
an <h1> heading along with normal paragraph text.
|
On many web pages nowadays, graphical images of ornately
rendered letters and logos are often used in place of the ordinary text headings
discussed in this hour. You'll discover how to create graphics and put them on
your pages in Part II, "Building
Practical Web Pages with HTML." However, old-fashioned text headings are still
widely used and have the advantage of being transferred and displayed almost
instantly, no matter how fast or slow the reader's connection to the Internet
is. |
It's important to remember the difference between a title and a heading.
These two words are often interchangeable in day-to-day English, but when you're
talking HTML, <title> gives the entire page an identifying name
that isn't displayed on the page itself, but only on the browser window's title
bar. The heading tags, on the other hand, cause some text on the page to be
displayed with visual emphasis. There can be only one <title> per
page and it must appear within the <head> and
</head> tags, whereas you can have as many <h1>,
<h2>, and <h3> headings as you want, in any order
that suits your fancy. Also, unlike the title, headings are always placed in the
body.
|
Don't forget that anything placed in the head of a web page is
not intended to be viewed on the page, whereas everything in the body of the
page is intended for viewing. |
You'll learn to take complete control over the appearance of
text on your web pages in Part
II. Short of taking exacting control of the size, family, and color of
fonts, headings provide the easiest and most popular way to draw extra attention
to important text.
Validating Your Pages
I'm going to break tradition and recommend something that few
web designers currently bother doing: I'm going to suggest that you validate all
of your web pages. Few web designers bother with validation because we're still
in the early stages of the rebirth of the Web as a more structured web of
consistent pages, as opposed to a cobbled-together jungle of hacked code. It's
one thing to design and draw a beautiful set of house plans, but it's quite
another for an architect to stamp it as a safe structure suitable for
construction. Validating your web pages is a similar process, except in this
case the architect is an application instead of a person.
Validation is the process of
running your pages through a special application that searches for errors and
makes sure that your pages follow the strict XHTML standard.
The good news about web page validation is that it's very easy
to do. In fact, the standards body responsible for developing web standards, the
World Wide Web Consortium, or W3C for short, offers an online validation tool
you can use. Follow this URL to try validating a page: http://validator.w3.org/. The
W3C Markup Validation Service is shown in Figure 2.4.
[View full size
image] 
If you've already published a page online, you can use the
Validate by URL option. Otherwise, use the Validate by File Upload option
because it allows you to validate files stored on your local computer file
system. Just click the Browse button, browse to the file, and then click the
Check button. If all goes well, your page will get a passing report as shown in
Figure 2.5.
[View full size
image] 
If the W3C Markup Validation Service encounters an error in
your web page, it will provide specific details including the line numbers of
the offending code. This is a great way to hunt down problems and rid your pages
of buggy code. So not only does document validation allow you to know whether
your pages are constructed properly, but it also assists you in finding and
fixing problems before you post pages for the world to see. I Hope You Enjoy This Blog Thank You For Reading My Blog
| |


0 Comments